GenBank Upload
Installing the Geneious Plug-in
Note
The most up-to-date GenBank Submission plug-in version is 1.6.4, which can be found here.
We will be using Geneious’s GenBank Submission plug-in to submit completed sequences to GenBank. The Geneious GenBank Submission Plug-in does all of the hard work of bundling together the various parts of a GenBank submission – sequence data, specimen metadata, trace files, etc.
The easiest way to install the plug-in is within Geneious. Go to Tools > Plugins. In the top “Available Plugins” section, you should see “GenBank Submission” as one of the featured plugins (that’s why there is a star next to it).
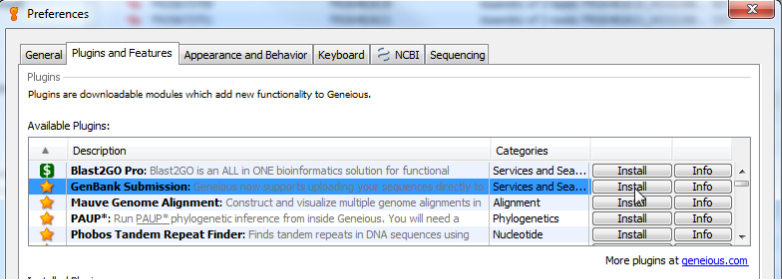
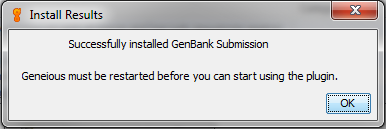
Click “Install”, and Geneious will start downloading it from the Internet. If all goes well, you should see a message telling you that installation was successful, and that a restart will be needed. Restart Geneious.
Using the plug-in
Because traces are a required part of a BARCODE keyword record on GenBank, use the Assembly as the basis of GenBank submission.
Organize the assemblies you want to submit, and then go to Tools > Submit to GenBank. Make sure to only select assemblies from one gene at a time. For example, you will have to make a separate submission package for rbcL and matK sequences.
You will see a window appear that has the following sections. Each section is detailed below.
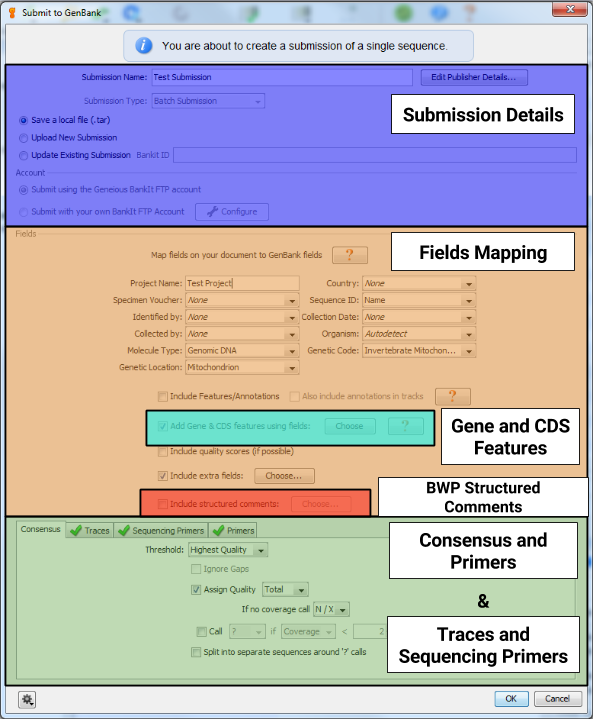
Submission Details
The first part of the GenBank submission deals with filling out the contact details and attributions for your sequence submission, as well as choosing how to submit to GenBank. Give the “Submission Name” field a descriptive name for your submission. This entry will not show up in the GenBank record. Also, be sure to select the option of “Save a local file (.tar)”.
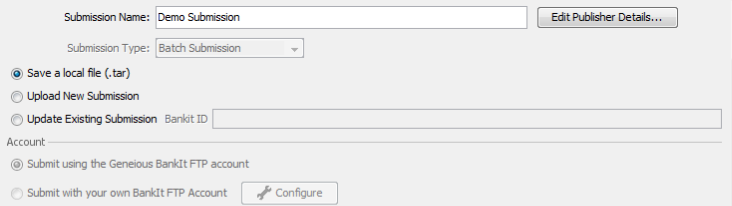
Click on the “Edit Publisher Details…” button to bring up the Publisher Details dialog box.
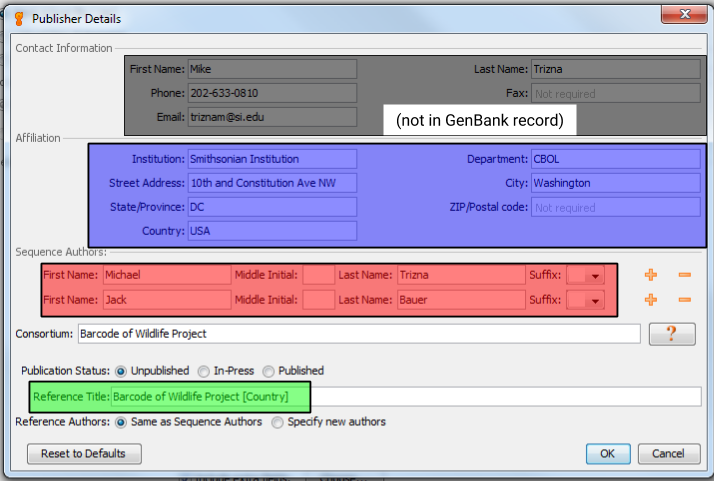
- Contact Information
- Fill out the top section with the contact information for your submission. This will be the information that GenBank staff will use to contact the submitter with questions or updates for the submission.
- Affiliation
- Fill out the relevant information for the institution that produced these sequences. The entries in this section will show up in the GenBank record, so be sure to provide accurate and consistent information.
- Sequence Authors
- List as many people who were involved in the production of these sequences as you can think of. Keep in mind that only these people will be authorized to make changes to the GenBank record.
- Consortium
- Always fill this in as “Barcode of Wildlife Project”. This will allow for easier searching and filtering of all BWP-generated sequences.
- Publication Status and Title
- We will be generating several different scientific publications about the sequences generated from the Barcode of Wildlife Project, but for now select “Unpublished” for the Publication Status, and “Barcode of Wildlife Project [country]” (where [country] is the name of the BWP partner country that produced the sequence.) Again, this allows for easier searching and filtering, and we will be able to add publications to sequences as they are published.
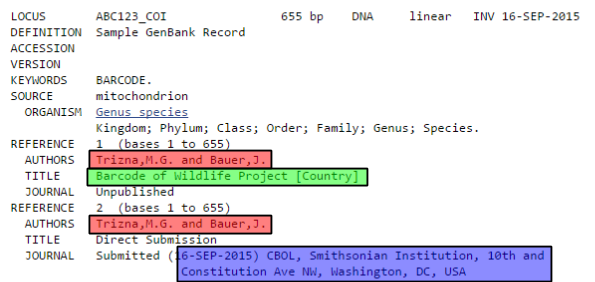
This portion of a sample GenBank record shows how the different parts of the Publisher Details section will appear when the record is published.
Fields Mapping
The next part of the GenBank submission, will be to map all of the different specimen metadata fields to your GenBank record.
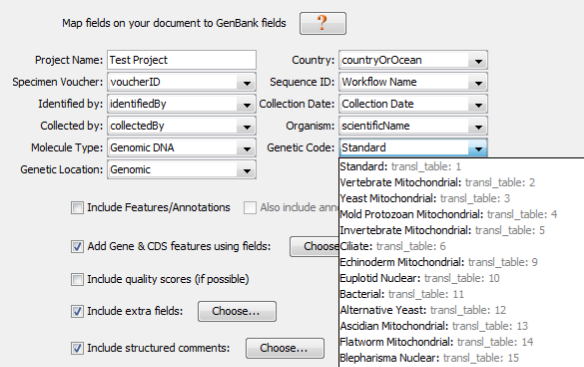
This screenshot shows the appropriate FIMS fields to select for each of the GenBank fields.
- Project Name
- Just like the “Submission Name” field at the beginning, this entry won’t end up in the GenBank record, but should be a meaningful name used to organize your sequences.
- Country
- This will become the “country” field in GenBank. It corresponds with the FIMS field “countryOrOcean”, which has already been validated to be part of the NCBI country list.
- Specimen Voucher
- This will become the “specimen_voucher” field in GenBank. It corresponds with the FIMS field “voucherID”, which should be a colon-separated triplet comprised of [institutionCode]:[collectionCode]:[catalogNumber].
- Sequence ID
- This field will not be published as part of the GenBank record, but it is very important because this field will connect the specimen data, sequence data, and trace data. Select the LIMS field “Workflow Name” for this.
- Identified by
- This will become the “identified_by” field in GenBank. It corresponds with the FIMS field “identifiedBy”. It is required for the BWP Data Standard, but if it is unknown you can select None.
- Collection Date
- This will become the “collection_date” field in GenBank. We separated this into “yearCollected”, “monthCollected”, and “dayCollected” fields in FIMS so that each could be validated. However, Geneious should automatically combine these fields into one “Collection Date” field if your assemblies are annotated correctly.
- Collected by
- This will become the “collected_by” field in GenBank. It corresponds with the FIMS field “collectedBy”. It is required for the BWP Data Standard, but if it is unknown you can select None.
- Organism
- This field corresponds with the “scientificName” field from FIMS. It will be checked against the NCBI taxonomy database, so make sure that it is already in the database, or be prepared to create a new entry in the database. The name should only be the binomial name (or trinomial if subspecies), and should not include the taxonomic name authority.
- Molecule Type
- This will always be “Genomic DNA” for DNA Barcode records.
- Genetic Code
- For COI barcode sequences, this will be either “Vertebrate Mitochondrial” or “Invertebrate Mitochondrial”. (Make sure to separate vertebrates and invertebrate submissions, as you can only choose 1.) Plant barcode sequences (matK and rbcL) will always be “Baterial” (the full name that Geneious abbreviated is “The Bacterial, Archaeal, and Plant Plastid Code”).
- Genetic Location
- For COI barcode sequences, this will be “Mitochondrion”. For plant barcode sequences (matK and rbcL), this will be “Chloroplast”.
Gene and CDS Features
The next step will be to let GenBank know which gene was sequenced. As you can see in the snippet from a sample GenBank record below, this will also provide enough information for Geneious to automatically generate the protein amino acid sequence as well.
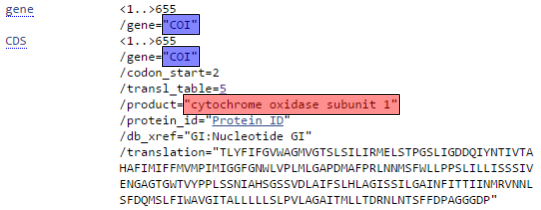
Since DNA barcodes are not full gene sequences, select “Partial” for both Gene Feature and CDS Feature.
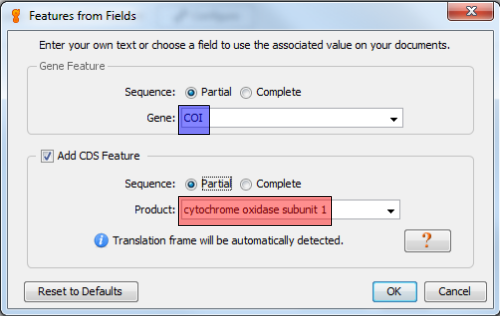
The following table will show the corresponding Gene and CDS Product name for each DNA barcode region. You can copy and paste directly from here.
| Gene | CDS Product |
|---|---|
| COI | cytochrome oxidase subunit 1 |
| matK | maturase K |
| rbcL | ribulose-1,5-bisphosphate carboxylase/oxygenase large subunit |
Non-BARCODE region sequences
If you are creating submission files for sequences for protein-coding regions that are not part of the DNA Barcode Data Standard, you can still use the Gene and CDS Features. However, it is very important that you ensure that “Experimental Strategy” in the Traces tab is set to “TARGETED LOCUS”. This is reiterated in the “Traces and Sequencing Primers” section below.
If you are creating submission files for sequences that are NOT protein-coding, follow the instructions laid out in the Annotating for ITS GenBank Upload special SOP.
Here are the Gene and corresponding CDS Product for common non-barcode regions. If you are unsure, look at existing sequence on GenBank.
| Gene | CDS Product |
|---|---|
| CytB | cytochrome b |
BWP Structured Comments
This window will appear when you check the button next to “Include structured comments”, and then click the “Choose…” button. These are the Barcode of Wildlife Project special fields that set apart BWP GenBank records from regular BARCODE keyword records. The screenshot below shows the appropriate FIMS field to choose for each structured comment field. You can also include additional non-required structured comment fields (chainOfCustody or coordinatePrecision) by checking the box next to “Enable optional comments”.

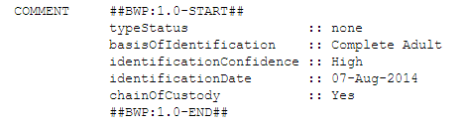
This screenshot of a sample BWP GenBank record shows how the BWP structured comment fields will appear.
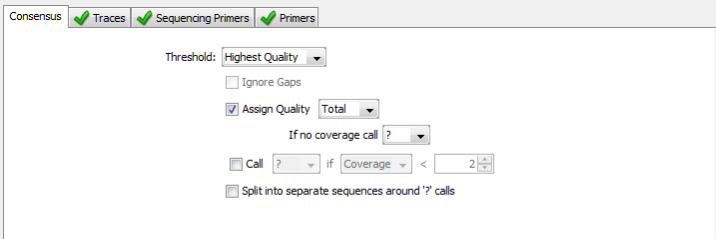
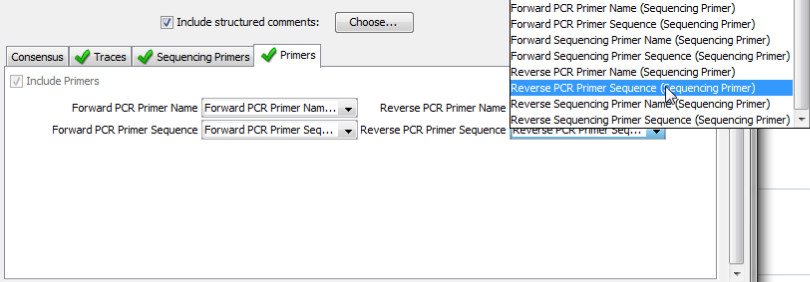
Consensus and Primers
Since we are submitting from an assembly of traces, we need to specify to Geneious how to calculate the sequence to submit to GenBank. Keep the default settings.
PCR Primers are a required component of the Barcode Data Standard. You will need to tell Geneious which of your fields holds the PCR primer names, and PCR primer sequences. The appropriate fields should be populated automatically.
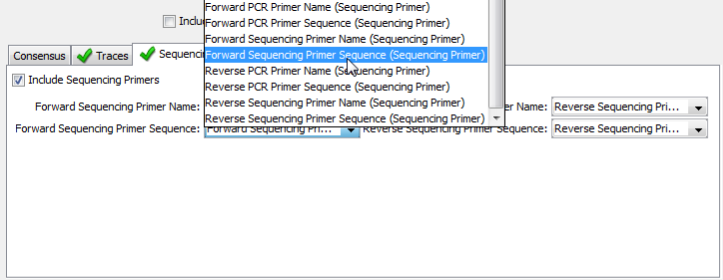
Traces and Sequencing Primers
- Experimental Strategy
- Choose “BARCODE” for this field if you are creating a submission for one of the official BARCODE gene regions (COI for animals, or rbcL and matK for plants). If you are submitting another region, then choose “TARGETED LOCUS”.
- Sequencing Strategy
- Always choose “PCR”, even for non BARCODE gene regions.
- Center Project Name
- Enter the name of the location where the traces were generated.
- Base Calling Program
- If you generated your traces with an Applied Biosystems sequencer (your trace files will all end with “.ab1”), then enter “KB Basecaller”. This is the name of the software that is on all ABI sequencers that decides what each base in your trace files are.
- DNA Source Type
- This will always be “Genomic DNA”.
- Trace End
- Leave this as the default value of “Let Geneious determine”

If your version of the Geneious plug-in does not show this exact set of field options for “Traces”, then you need to upgrade to version 1.6.4.
Just like for the previous “PCR Primers” section, these fields should all be populated by Geneious automatically.