Downloading traces from LIMS
The Geneious Assembler Module is used to edit, save, export and ultimately publish the sequence data.
You have two options for importing the raw traces to the Assembler Module:
- Downloading the raw traces from the LIMS database
- Directly importing the traces from disk
The main advantage of the first option is that all of the specimen’s associated FIMS and LIMS meta-data are attached to its trace file. Alternatively, if importing traces from disk, none of the specimen’s associated FIMS or LIMS meta-data will be attached, and it can prove more difficult to attach this meta-data after import. As a result, you should utilize the first option whenever possible.
Downloading the raw traces from the LIMS database
- Log in to the Biodcode LIMS plug-in.
- Search for the relevant cycle sequencing plate(s) in the Biocode search window.
- Select the relevant plate(s) from the search results.
- Click the “Biocode” button in the Toolbar and choose “Download Traces from LIMS” to begin the operation.
- A new window will open, prompting you to choose a destination folder in the local directory for the downloaded traces. Either select an existing folder or create a new folder. To generate a new folder, highlight the folder in the Local Directory where you want the new folder to be located, select “New Folder”, and provide a name.
- Once the destination folder has been selected, click “OK “and Geneious will begin downloading the trace files into this folder.
Alternatively, if the exact names of cycle sequencing plates are known, it is possible to download the plates directly without having to perform a search. To do this:
- Log in to the Biodcode LIMS plug-in.
- Highlight a destination folder under the Local Directory.
- Select the “Biocode” button in the Toolbar followed by the “Download Traces from LIMS” option and enter the cycle sequencing plate name manually.
- If you want to download traces from more than one plate, use the “+” button to add more fields for the additional plate names.
- Once this is complete, click “OK “and Geneious will begin downloading the trace files into this folder.
Directly importing the traces from disk
There are two ways to do this:
Drag-and-Drop
- Outside of Geneious, navigate in your computer’s file explorer to find the location of your trace files.
- Select the trace files to import, and drag them into Geneious and into a selected folder in the local directory.
Once the raw trace files have been imported, it is necessary to define the read direction. To do this:
- Choose either the forward or reverse trace files and select “Sequence” in the Menu bar followed by “Set Read Direction”.
- Choose the read direction and click “OK”. It is only necessary to choose the direction for one set of reads because the other set of reads will be assigned the opposite direction by default.
- After performing this task, an extra column will be added to the Document Table titled, “Is Forward Read” with a value of true or false.
If the forward and reverse traces are in different folders, it’s easiest to import all of the traces from one folder, set the read direction for that folder and then import the second folder. The Search/Filter dialog box in the upper right-hand corner of the Geneious window can be used to locate a particular direction of reads based on trace names if both forward and reverse traces are imported in one folder.
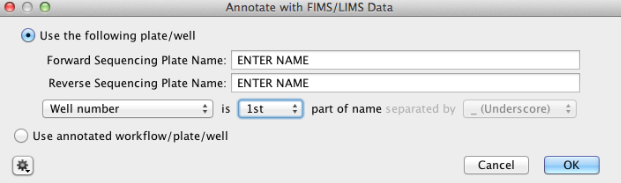
Traces imported into Geneious directly from disk have none of the specimen’s associated FIMS or LIMS meta-data attached. It is possible to annotate traces with the associated meta-data from the FIMS, but this must be done pre-assembly (with the traces) because forward and reverse traces can come from different sequencing plates.
To attach the associated meta-data:
- Click the “Biocode” button in the Toolbar, then select “Annotate from FIMS/LIMS Data”.
- A new window appears where you enter the forward and reverse sequencing plate names (from the LIMS) that correspond to the traces. You must also identify which part of the raw trace name identifies the well location.
- Click “OK” and the operation will run