Generating extraction plates
Creating the plate (96 wells)
The first step of the LIMS workflow is the generation of a DNA extraction plate. In LIMS terms, an “extraction plate” is a set of DNA extractions following identical protocols and can include anywhere from a single extraction up to a plate of 384 extractions. This set of extraction will be moved through the entire pipeline together.
To create an extraction plate:
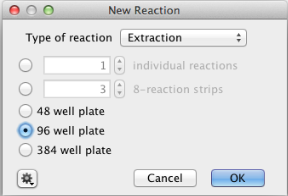
- Click the “New Reaction” button on the Geneious Toolbar.

- In the drop-down menu of the “New Reaction” window, choose “Extraction” from the “Type of reaction” drop-down menu. Select the “96 well plate” size option.
- A new window will open displaying a map of a 96 well extraction plate. The FIMS data must be uploaded to an empty extraction plate so that the each specimen’s field data is correctly associated with that same specimen’s laboratory workflow.
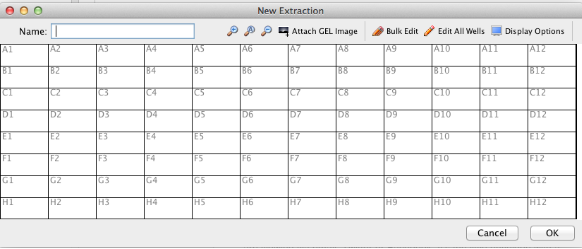
- Insert a name for the extraction plate into the relevant field in the window.
- Click the “Bulk Edit” button (found in the toolbar, as seen in image above). This will allow you to attach the FIMS meta-data from all tissues to each tissue’s associated workflow in LIMS.
- A new “Edit Plate” window will appear.
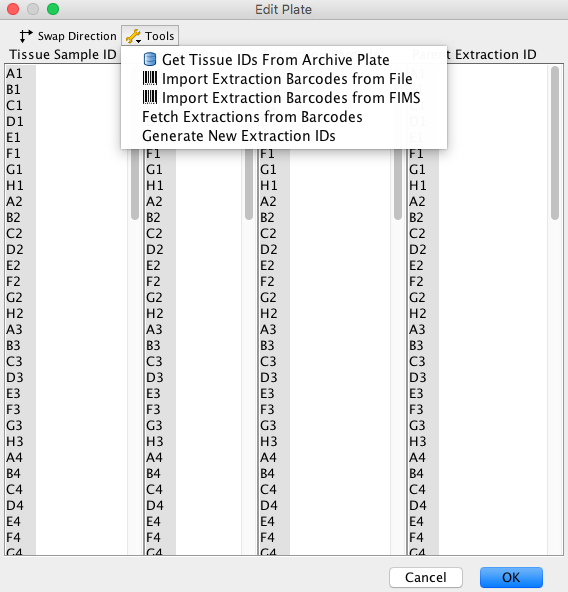
- Click on “Tools” and select “Get Tissue ID’s From Archive Plate” from the dropdown menu.
- Another new window “Get FIMS plate” will appear.
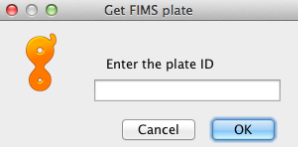
Here you must enter the extractionPlateID value that was included in the FIMS spreadsheet for this plate/dataset. Click “OK” once complete.
A new window will appear indicating the LIMS is fetching the tissue ID’s from the FIMS database. When successful, the “Tissue Sample Id” fields in the “Edit Plate” window will be populated. Alternatively, if you receive a message indicating that the plate cannot be found in the FIMS, check:
- that the plate ID is spelled exactly as it was included in the FIMS spreadsheet.
- that the FIMS spreadsheet was successfully uploaded to the FIMS; and
- that when you logged in to the LIMS that you selected the correct FIMS field for the “Plate name field” of the log-in window.
After successful upload, select “Generate New Extraction IDs” from the “Tools” dropdown menu. The LIMS will automatically populate the second column of the window (Extraction Id). The .1 indicates this is the first extraction in the LIMs for that particular tissue, .2 would indicate it is the second and so on.
Finally you want to import the Extraction Barcode’s for each DNA extract. This can be done in two different ways:
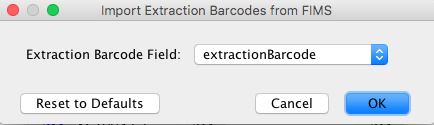
Option 1: This is our preferred method. Select “Import Extraction Barcodes from FIMS” from the “Tools” dropdown menu. A new window will appear, and select the FIMS column that contains the extraction barcodes from the dropdown menu - in our case it is “extractionBarcode”. For this to work, you must ensure that your FIMS spreadsheet contains the unique extraction barcodes.
- Option 2: Select “Import Extraction Barcodes from File” from the “Tools” dropdown menu. Select the file generated from the plate scanner or alternatively you can copy and paste the data from the file generated from the plate scanner into that column in the window. Since copy and pasting is open to user error, we strongly advise against using it unless absolutely necessary.
- Once this is complete Click “OK” and you will be brought back to the “New Extraction” window.
- Here, click on “Edit All Wells” to open a new window.
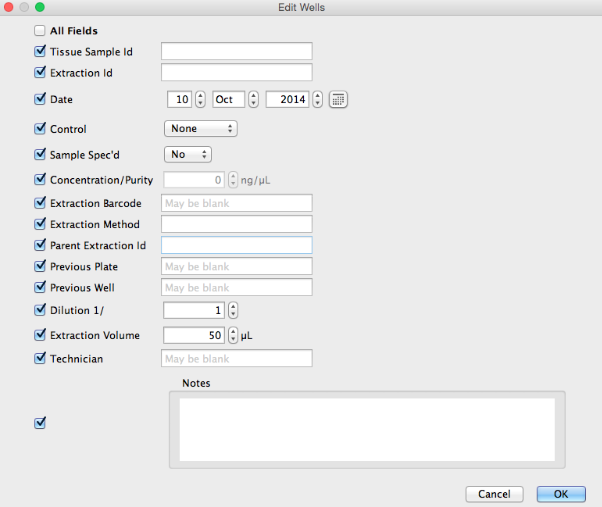
- This window allows you to enter information about the extraction - date, method, technician etc.
- Once complete, click “OK” which will bring you back to the “New Extraction” window.
- Click “OK” in this window for the LIMS to save the extraction plate.
Additional Information:
More information on the “Edit Plate” Window:
In this window, the well locations are displayed on the left hand side of each column to make placement easier. The “Swap Direction” button allows the user to choose between reading the plate horizontally or vertically. Clicking “OK” will attach the FIMS meta-data to the new extraction plate.
Under the “Tools” menu within the “Bulk Edit” window there are a number of options, described below in order of the dropdown menu, available.
- The “Get Tissue ID’s from archive plate” option allows the extraction plate to be filled with extraction IDs from the FIMS data source.
- “Import Extraction Barcodes from File” allows the extraction barcode values to be directly imported from the output file of the scanner if 2D well barcodes are being used.
- “Import Extraction Barcodes from FIMS” allows the extraction barcode values to be directly imported from the FIMS.
- “Fetch extractions from barcodes” is used during “cherry picking” to populate newly reconstituted plates from prior plate locations.
- “Generate Extraction IDs” automatically generates appropriate extraction IDs based on the tissue sample IDs.
More information on editing wells in the plate:
The “Edit All Wells” or “Edit Selected Wells” button, found in the toolbar of the “New Extraction” plate window, opens a customizable viewer and editor for plate documents. It is shown both when creating new plates, and when viewing existing plates in the database. Wells can be selected in the plate by dragging the mouse across the plate to select a number of wells, or holding down the shift and ctrl (command on mac) keys to help select multiple individual wells. When a well, or wells, have been selected, click “Edit Selected Wells” to customize those wells.
The “Edit Wells” dialog window will open (see image above), and it has a column of checkboxes on its left hand side. Values in the checked fields will be applied to all selected reactions, and unchecked fields will be left as they are. Most values can simply be entered into a dialog box. Make sure to save the plate after making any edits to it.
More information on the Display Options in the plate:
Clicking the “Display Options” button, found in the toolbar of the New Extraction plate window, opens the “Display” dialog window (below). The split-pane allows the user to choose any number of fields from the FIMS or LIMS database for display in the wells.
The available fields are shown in the left hand pane, and when fields are in the right hand pane they are displayed in the wells. To move a field between the two panes, select it and click the right or left arrow depending on the direction of the move. Once the fields to display have been decided upon, their display order can be altered using the up/down arrows on the right hand side of the dialog box. The field in the top position of the list will be displayed more prominently in the well, as it will be in larger, bold text.
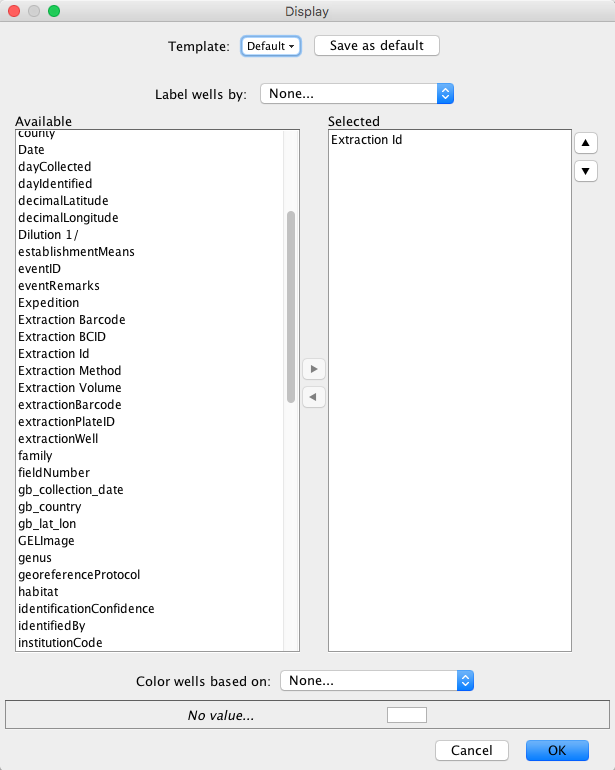
Each well can be color-coded according to a particular field value. To select the field for color-coding use the “Color wells based on” drop-down menu found at bottom of the dialog window. All possible values for that field will be displayed and a color can be assigned to each of the values using the color chart.
A display setting can be saved as a template by clicking the “Select a template” button at the top of the dialog window and clicking “Create template”. Click the “Save as Default” button to make that template the default. Separate defaults are stored for extraction, PCR, and cycle sequencing plates.