Generating PCR Plates
Searching for existing plates
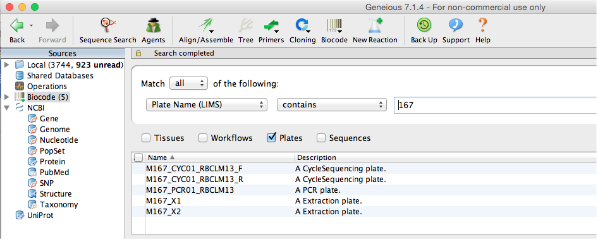
Biocode LIMS searches can return four types of documents:
- Tissue sample documents – Each of these represents a tissue sample in the field database. Tissue documents contain collection and specimen information.
- Plate documents – These represent a plate in the LIMS, and can be extraction, PCR, or cycle sequencing plate types.
- Workflow documents – These contain a set of linked reactions performed on an extraction.
- Sequence documents - Sequences entered into the LIMS when traces/assemblies are marked as passed/failed.
Searches are performed by entering text into the search box (found above the Display Table) and will return all matching documents.

Searches are restricted to particular types of documents by deselecting the checked boxes in the search window. To explicitly search against particular fields, click the “More Options” button. Click the “+” and “–” buttons on the right hand side to add or remove fields from the search. Choose the search fields of interest using the left-most drop-down menu and choose the middle drop-down menu to constrain search conditions.

Creating a PCR Plate from an existing extraction plate
From this point forward, generating new plates, whether PCR or cycle sequencing, is very similar to the way the extraction plate is generated. Geneious can use an existing plate as a guide to create a new plate, so that new reactions are appended onto corresponding workflows. To do this, select an existing plate from the Biocode LIMS plug-in Search Results Window found in the Document Table.
- Click “New Reaction” in the Geneious Toolbar and check the “Create plate from existing document” checkbox.
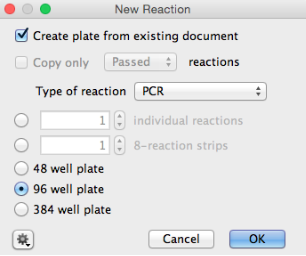
- If the reaction types are the same (for example, creating an extraction plate as a working aliquot from an archival extraction plate), then all reaction parameters will be copied to the new plate. If the reaction type is different (for example, creating a PCR plate from an existing extraction plate), then only the extraction ID’s will be copied across.
- Select the Type of reaction as PCR, click OK and a “New PCR” plate window will appear.
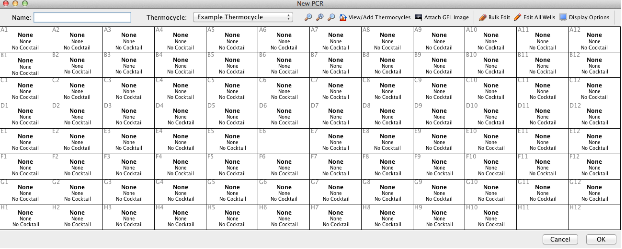
- Enter a plate name in the box provided. This name should be descriptive and unique to allow easy and successful searching in the LIMS. (See LIMS naming conventions)
- The next step is to select the thermocycling protocol that was used for this PCR plate. The Geneious LIMS stores thermocycling profiles and these are found in the “Example Thermocycling” dropdown menu in the New PCR plate Toolbar. Creating new profiles is described in the Additional Information section at the end of this document.
- Next, to edit all wells on the PCR plate, select “Edit All Wells”. Alternatively, to edit individual wells, highlight the selected wells in the plate and click “Edit Selected Wells” in the plate toolbar. In both cases the “Edit Wells” window opens.
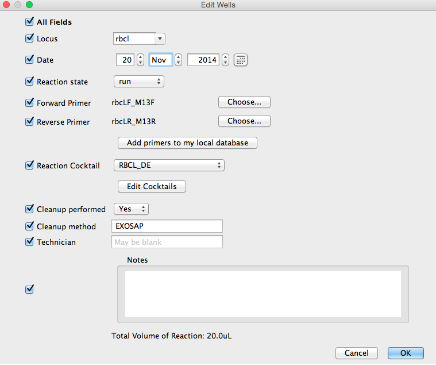
- This window has a column of checkboxes on its left hand side. Values in the checked fields will be applied to all selected reactions, and unchecked fields will be left as they are.
- Most values can simply be entered into a dialog box, with the exception of PCR cocktails, cycle sequencing cocktails, thermocycler profiles, and primers which are set elsewhere.
- The target locus can be selected in the “Locus” drop-down list. This list is pre-populated, however, it can be manually edited to include additional loci for use in the LIMS.
- A PCR reaction can be marked as “not run”, “run”, “passed” or “failed”.
- The forward and reverse PCR primers are selected using the “Choose” button which points to a selected folder on the Local Directory where primers are stored by the user. (See Creating primers)
- The reaction cocktail can be chosen from a list of existing cocktails, or by creating a new cocktail, described in the Additional Information section at the end of this document.
- Gel images can be uploaded by clicking the “Gel Images” button in the plate window and pointing to the relevant file. More information on attaching a gel image and scoring is available in the Additional Information section below.
- Once all editing of the plate is complete, Click OK.
Additional Information
Creating thermocycling protocols:
- To create custom thermocycler profiles, click “View/Add Thermocycles” in the “New PCR” windown.
- The “Edit Thermocycles” window opens (below) and this displays all of the stored profiles in the left section of the window and a diagram of the selected profile in the right section.
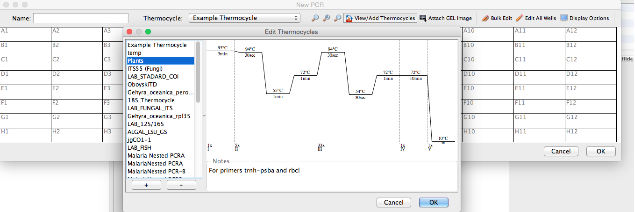
- Click the “+” button on the lower left-hand corner of the window to add a new profile.
- The “New Thermocycle” window will open. The temperatures and cycles associated with the new program can be entered using the dialog boxes and “Edit Cycles” buttons.
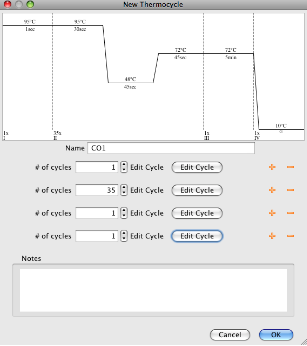
- The “+” and “-” buttons to the right of the “Edit Cycle” button allow for addition or removal of steps in the thermocycling profile.
Note
It is not possible to modify thermocycler profiles once they are created and profiles can only be deleted if they are not associated with a workflow. As a result, double check any new profiles you create before saving them.
Creating custom PCR cocktails:
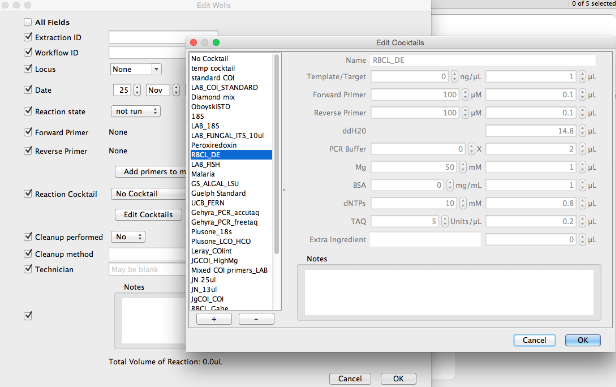
- Click “Edit Cocktails”, then click the + button in the dialog, and enter the volumes and concentrations in the fields provided.
- There is space to store one extra ingredient (both concentration and volume) that isn’t in the provided ingredient list.
- Any additional information about the new cocktail can be stored in the Notes field.
Note
It is not possible to modify cocktails once they are created, and cocktails can only be deleted if they are not associated with a workflow. Cocktails are available also to all users. As a result, double check that the cocktail you require doesn’t already exist prior to creating it.
Attaching and scoring gel images:
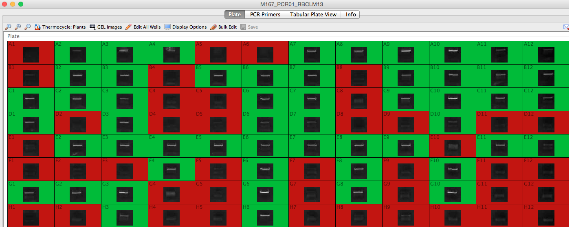
Gel images can be attached to all types of plates at various points in the pipeline. If attaching a gel (or gels) when creating a new plate click the “Attach GEL image” button found in the toolbar of the plate. When attaching a gel or gels to an existing plate, click “GEL images” in the plate’s toolbar. In both cases the “Edit Gel Images” window will appear. Click “Add”, then browse to find the image or image files to be attached. Geneious will accept images in JPEG, GIF, PNG, and TIFF formats. Notes can also be added each gel image at this point.
Once the image or images are attached, click the “Split GEL” button located above the image in the gel viewer window. To map the samples on the gel to the workflows in the plate, populate the four dialog boxes and choose the read direction of the plate i.e., vertical or horizontal. To generate the grid, drag the mouse/pointer over the image. If the grid is misplaced, start again by dragging the mouse over the image. If the gel image is not straight causing the grid to line up incorrectly, use the sliding bar in the top right of the window to level the image. Automated calling of pass/fail reactions in the gel is possible by checking “Automatically Score plate”. Click “OK” once the grid is in the correct position.
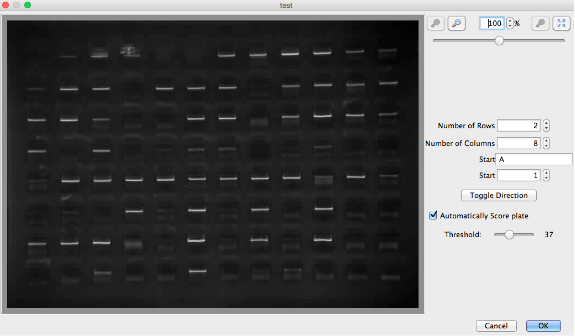
To verify the scoring of the gel image, re-open the plate view. It is possible to manually change the call by selecting the well in the plate viewer and changing the reaction state in the drop-down menu. The program may score primer dimers in the gel, so if they are present, extra care should be taken and the calls double checked.