Assembling contigs
Once sequencing is complete, the raw data needs to be assembled into bidirectional contigs. The Geneious assembler module is used to edit, save, export and ultimately publish the data.
Two slightly different pipelines can be employed for trimming the raw traces and assembling them into contigs:
- Incorporating the trimming of traces into the assembly function
- Trimming all traces first, then assembling into contigs
Note
Any settings or parameter values outlined below are guidelines. It is recommended that the user evaluates different trim and assembly settings to establish what is optimal for the group and/or marker being analyzed.
OPTION 1: Trimming and assembling at the same time
- Select all the raw traces you want to assemble into a contig.
- Click on “Align/Assemble” in the toolbar.
- Select “De Novo Assemble” in the dropdown menu.
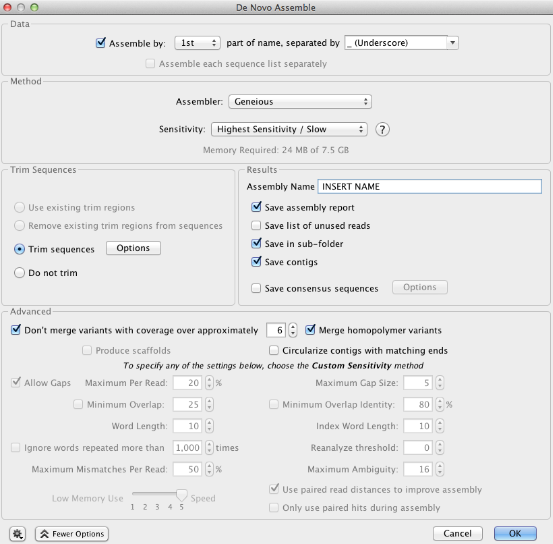
De Novo Assemble window
- In the “Data” section, specify the unique part of the trace filename you want to use to match the forward and reverse direction traces. This will depend on how you labelled your raw traces.
- In the “Method” section, choose the Assembler and Sensitivity. We recommend the options displayed below, however, it is also possible to choose “Custom Sensitivity” from the dropdown menu, and choose custom parameters (for example, minimum overlap). If you select “Custom Sensitivity” many of the options in the “Advanced” section of the window will now be available for selection.
- In the “Results” section, insert an Assembly Name. After the assembly is complete all contigs will be deposited in a folder in the local directory with this title. “Save assembly report” and “Save results in a new subfolder” should both be selected.
- In the “Advanced” section, ensure that the “Circularize contigs with matching ends” option is unchecked.
- In the “Trim Sequences” section select “Trim Sequences” and then click on the Option button. A “Trim Options” window appears and this is discussed further below.
Trim Options window
When creating your sequencing assemblies, be sure to select the correct options in the “Trim Options” window.
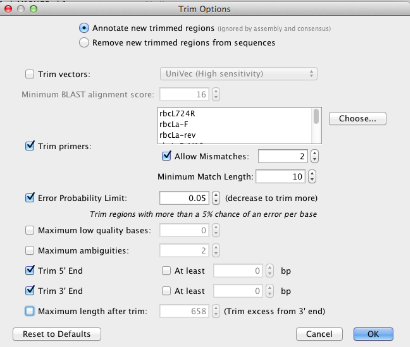
The first option to choose between is “Annotate new trimmed regions” or “Remove trimmed regions from sequences”. If “Annotate new trimmed regions” is selected, then the information in the trimmed region of the trace is annotated and not deleted. The underlying raw data is maintained throughout downstream analyses for possible adjustment later in the pipeline. Assembly and other analyses automatically take the trims into account, and exclude these regions in all calculations.
If either “Remove new trimmed regions from sequences” or “Remove existing trimmed regions from sequences” is selected (the latter option will only show in this window when the selected traces have been previously trimmed), then the trimmed regions are deleted and the associated information will not be available for downstream analyses.
“Trim vectors” uses a clone of NCBI’s VecScreen tool (Altschul et al, 1997) to screen for vector contaminants from the NCBI UniVec database.
Check “Trim Primers” to trim the appropriate PCR primers from each raw trace. Clicking the “Choose” button points you to the list of primers you have saved in your local directory. It is possible to choose as many primers for trimming as required.
- If you are using M13 tagged PCR primers, you have two options for trimming. You can trim the full primer(s) including the M13 tag or alternatively you can just trim the untagged portion of the primers. We would lean towards the latter option, since the chances of finding the longer tagged version of the primer is slimmer than finding the untagged version.
- For Allow Mismatches we suggest you select “2” - if you insert too high a number here it will “find” the primers at the incorrect locations of the read.
- For a primer of 15-20 bp in length, we suggest you select “10” for Minimum Match Length. If you select too low a number here it will “find” the primers at incorrect locations of the read.
“Error Probability Limit” value of 0.05 is an appropriate starting value for trimming. This option works by trimming the trace sequence to find the longest possible untrimmed region, which has an overall error probability less than 5%. To trim more aggressively, decrease the limit or manually edit the trim by clicking and dragging either end of the annotation in the Sequence View.
- Select both Trim 5’ End and Trim 3’ End options, but leave “At least” UNCHECKED.
- Leave “Maximum length after trim” UNCHECKED.
- Once all settings are complete hit “OK”. This will bring you back to the “De Novo Assemble” window where clicking “OK” will begin the trim/assembly process. All the assemblies will be deposited into the folder you specified/named in your local directory. When the operation is finished, an Assembly Report and list of Consensus Sequences will also be added to the folder. Geneious will generate a new subfolder each time an assembly is run.
OPTION 2:Trimming and assembling in two separate steps
To trim traces:
- Highlight all relevant traces in the Document Table.
- Select “Annotate & Predict” from the Menu bar.
- Choose “Trim Ends” from the drop-down menu.
A “Trim Ends” window will open and this is essentially the same as the “Trim Options” window described earlier. Proceed with directions as laid out for that window.
To assemble previously trimmed raw traces into a contig: * Select all of the traces to assemble (and a reference sequence or list if applicable) then click the “Align/Assemble” drop-down button in the Toolbar. * Select “De Novo Assemble”. * The “De Novo Assemble” window opens. See previous section for description of the options available in this window. The only difference is noted below. * Since the trace sequences were previously trimmed, select “Use existing trim regions” in the Trim Options part of the window.
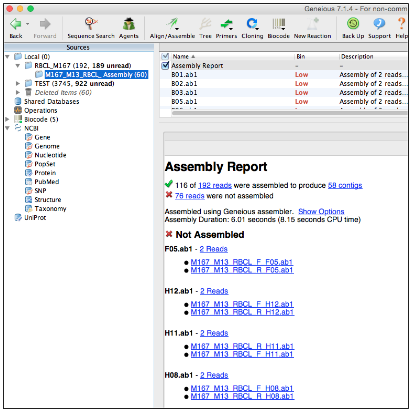
Additional Information
It is possible to re-trim trace sequences using different parameters at any stage. To do so select the traces for re-trimming and follow the steps outlined above. The only difference is the “Annotate new trimmed regions” option should be selected to have the new trims replace the old trims. When a trace sequence is re-trimmed, it stores the history of trims in the “Info” tab for each trace.
Manually trimming traces is also an option. To manually trim a trace, select a region at the end of the trace in the Sequence View, click “Annotate” and choose “Trimmed” for the annotation type. If a trace has multiple trimmed annotations for the same region, the largest trimmed annotation will be used.
The assembly report is found in the assemblies folder, regardless of implementing Option 1 or Option 2. It provides a record of which traces were assembled successfully and which traces failed. The blue hyperlink next to the green checkmark at the top of the report links to all traces that assembled successfully. The blue hyperlink next to the red “X” points the user to all traces that failed to assemble. Click the hyperlink and select the “Mark as Failed in LIMS” tool to mark these failed traces for re-sequencing.